mirror of
https://github.com/grey-cat-1908/portable-mc-server.git
synced 2024-09-22 19:22:00 +03:00
151 lines
9.3 KiB
Markdown
151 lines
9.3 KiB
Markdown

|
|
|
|
# Your Portable Minecraft Server
|
|
|
|
This is a project that allows you to easily install and configure a minecraft server on your Raspberry Pi or other similar device.
|
|
|
|
## Advantages
|
|
|
|
- Easy and very fast installation
|
|
- Does not require any knowledge
|
|
- Portable (you can bring your Raspberry Pi wherever you want)
|
|
- It is cheap (No need to pay for anything other than electricity if you already have a Raspberry Pi)
|
|
- Runs on Raspberry Pi 4 and Raspberry Pi 5 (4GB and 8GB models)
|
|
- You'll look cool in front of your friends if you run a server on the board (if they don't know what Raspberry Pi is)
|
|
- Does not load your computer
|
|
- You can control and configure everything (as long as your board has enough power)
|
|
|
|
## Recommendations
|
|
|
|
- Your Raspberry Pi should be 4GB or 8GB.
|
|
- You must have stable internet connection while using (you can set up a mobile hotspot)
|
|
- You should install and test everything at home. (Re-)Installing can take a long time if you have slow internet connection
|
|
- You should set `online-mode` to `false` if you have slow internet connection or would like to play using unlicensed account
|
|
- During the first installation, the device must be connected to the Internet, which is specified in **balenaCloud dashboard**
|
|
|
|
## Setup
|
|
|
|
1. Download and install [balenaEtcher](https://etcher.balena.io/).
|
|
2. Sign up for or login to the [balenaCloud](https://dashboard.balena-cloud.com/) dashboard.
|
|
3. Click on **Deploy with balena** button.
|
|
4. Click on **Create and deploy** button.
|
|
5. Click on **Add device** button.
|
|
6. Select your device type. Click on **Wifi + Ethernet**. Specify your WiFi network's SSID and Password.
|
|
7. Insert the SD-card into your computer.
|
|
8. Click on **Flash** button.
|
|
9. Insert your SD-card to the board.
|
|
10. Toggle on your board.
|
|
|
|
[](https://dashboard.balena-cloud.com/deploy?repoUrl=https://github.com/grey-cat-1908/portable-mc-server/)
|
|
|
|
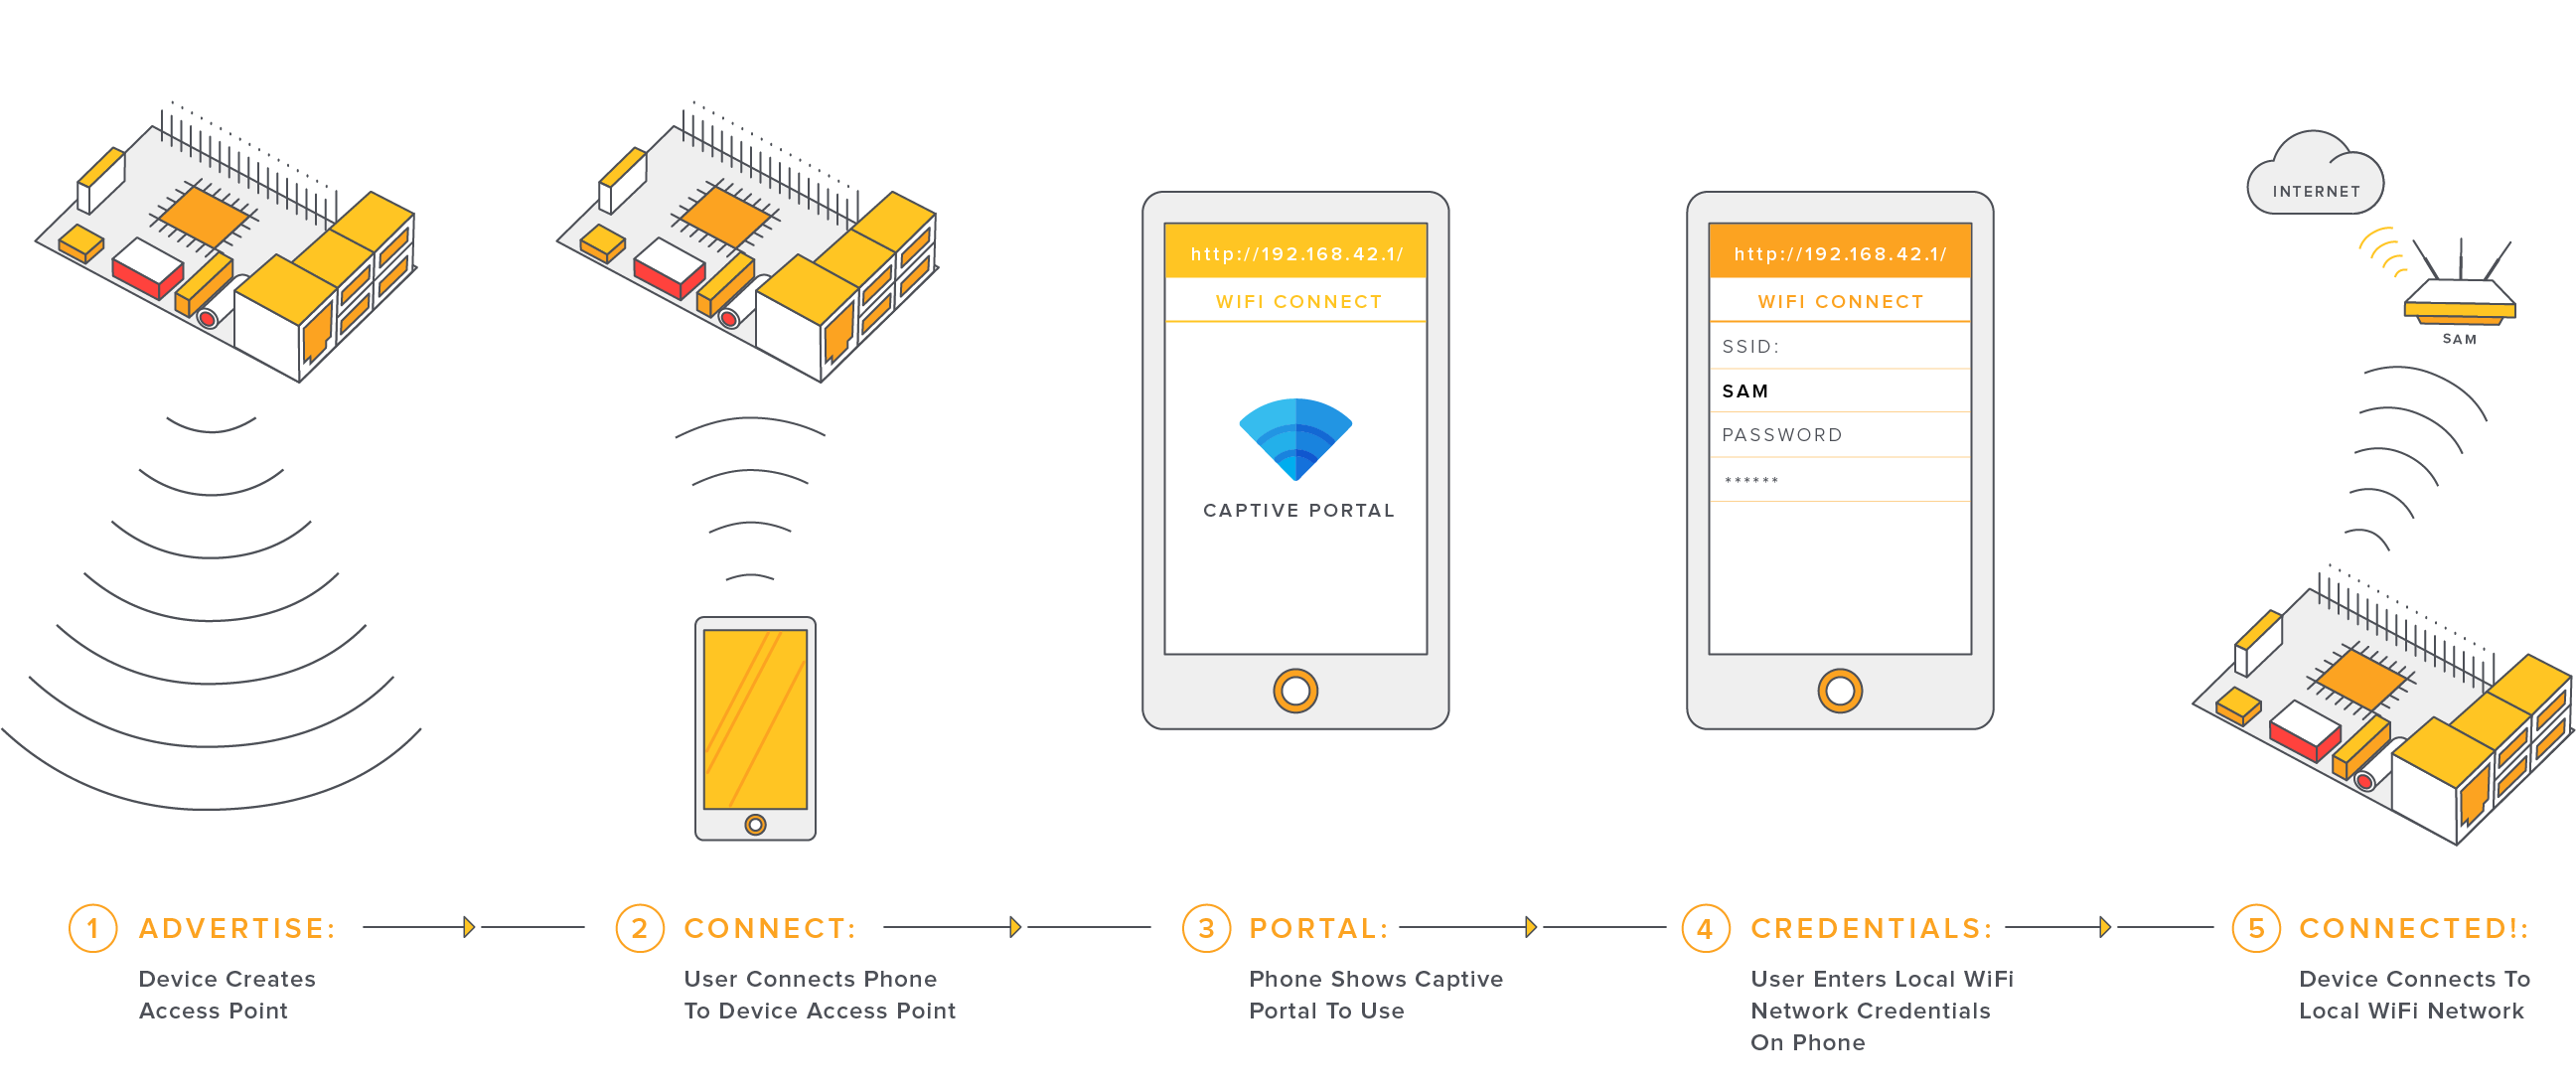
**NOTE:** For the device to download all the data, the initial Wi-Fi connection must be functional. You can create a mobile hotspot and change the Wi-Fi network later. If the board is unable to connect to the internet, it will establish a hotspot. You can connect to it and enter the details of the new Wi-Fi network.
|
|
|
|
|
|
|
|
**NOTE:** SSID of board's hotspot is `MinecraftServerSetup`. Password is `yourportablemcserver`
|
|
|
|
## Connect to the server
|
|
|
|
Remember that only users connected to the same WiFi network as the Raspberry Pi can connect, so it might be a good idea for one of your friends to share the internet from their mobile phone.
|
|
|
|
You can get your IP-Address within balenaCloud. You should copy IP-Address from the `LOCAL IP ADDRESS` in `Summary` block.
|
|
|
|

|
|
|
|
You can connect to your server like this:
|
|
|
|

|
|
|
|
Default port is `25565` (don't change it). Remember to change IP-address from the image to yours.
|
|
|
|
## Configuring
|
|
|
|
You can configure nearly everything by setting up the following Enviroment Variables:
|
|
|
|
| Variable | Description | Value |
|
|
|---|---|---|
|
|
| `RAM` | How much RAM do you want to allocate to the server? | `1G` (default) |
|
|
| `MC_VERSION` | What version of Minecraft do you want to install? | `1.21.1` (default) |
|
|
| `MC_SERVER` | Which server should be installed automatically? (only `pufferfish`, `purpur`, `paper`, `custom` are supported) | `paper` (default) |
|
|
| `SSH_PASSWORD` | SSH password | `admin` (default) |
|
|
| `FORCE_REINSTALL` | Would you like to reinstall your server? `1` - yes; `0` - no | `0` (default) |
|
|
| `SUPPORT_BEDROCK` | Would you like to add support for Minecraft Bedrock users? `1` - yes; `0` - no | `0` (default) |
|
|
| `CUSTOM_BUILD_URL` | Custom build URL. Only applies if you set the `MC_SERVER` value to `custom` | - |
|
|
|
|
**NOTE:** You can set Environment Variable within balenaCloud. On the left, simply click on “Device Variables” and then click the “Add Variable” button. Give it a name, and set the value.
|
|
|
|

|
|
|
|
**NOTE:** You can also delete everything on the server and automatically reinstall it. On the left, simply click on “Actions” and then click the “Purge Data” button. Insert `1` and click “Purge Data”.
|
|
|
|
## Using RCON
|
|
|
|
You can connect to your server console using Minecraft RCON. You only need server IP-address, RCON port (usually default) and RCON password (you should change it in server.properties, but default is admin).
|
|
|
|
If you are using Windows 10 (11) system, you can use [my simple batch script](https://gist.github.com/grey-cat-1908/6aa7894ae94588886aa5a1c7e786b5e4) to install and use Minecraft RCON.
|
|
|
|
## Connecting to the server using SFTP
|
|
|
|
I recommend using FileZilla to connect to the server via SFTP.
|
|
|
|
### FileZilla User Guide
|
|
|
|
The Host to connect to SFTP is the IP-Address you are using to connect to Minecraft Server, the protocol to choose is SFTP, the port number is 22, the username is “root” (without the quotes) and the password is “admin” (without the quotes). Once the connection is established, remember to navigate to the `/usr/src/mcfiles` directory.
|
|
|
|
**NOTE:** You can change your password by changing `SSH_PASSWORD` enviroment variable..
|
|
|
|
## Changing server
|
|
|
|
Purpur is automatically installed the first time you run it. If you want to change it, you can set the environment variable `MC_SERVER`. (See the configuration section for more details.) Remember to reinstall the server afterwards (set `FORCE_REINSTALL` environment variable to `1`).
|
|
|
|
**NOTE:** Please note that `pufferfish` versions can only take integer values, i.e.: `1.19`, `1.20` can be specified; `1.20.4` cannot be specified, the game will not start. If you specify version `1.20`, you will be able to play with `1.20.4`.
|
|
|
|
| Server | `MC_SERVER` value |
|
|
| --- | --- |
|
|
| [Pufferfish](https://github.com/pufferfish-gg/Pufferfish) | `pufferfish`
|
|
| [Purpur](https://purpurmc.org/) | `purpur`
|
|
| [Paper](https://papermc.io/) | `paper`
|
|
|
|
You can also set the `MC_SERVER` value to `custom`, but then you must also set the `CUSTOM_BUILD_URL` environment variable. Maybe someone has already done this and written instructions. I suggest you look for the instructions [here](https://github.com/grey-cat-1908/portable-mc-server/issues) or try to do that by yourself.
|
|
|
|
## Installing plugins
|
|
|
|
You can install your plugins by connecting to the server via SFTP. Download the plugins you need from reliable sites (`hangar.papermc.io`, `spigotmc.org` or official plugin sites). Put them in the plugins directory and restart the server. (e.g. with RCON (command `restart`) or by restarting the minecraft service on balenaCloud).
|
|
|
|
## Disabling online-mode and more...
|
|
|
|
You can change your `server.properties` by connecting to the server via SFTP. Open and edit file called `server.properties`.
|
|
Here you can set `online-mode` value to `false`. After that users will not need a licensed Minecraft afterwards.
|
|
Also you can change `rcon.password`, `max-players` value, `motd` and much more things, that are not listed here (go to website `server.properties` to find more properties)
|
|
|
|
Remember to restart yor server (e.g. with RCON (command `restart`) or by restarting the minecraft service on balenaCloud).
|
|
|
|
## Mods...?
|
|
|
|
Mods are not supported at the moment, and I don't see the point. As far as I know, servers with mods are not very common, are more difficult to use (everyone has to have the same mod version, etc.), and are more resource intensive (not sure if the Raspberry Pi can handle it).
|
|
|
|
**NOTE:** However, you could try installing mods using the `custom` server installation option. If you know how to do that, you can post a complete installation guide for beginners [here](https://github.com/grey-cat-1908/portable-mc-server/issues). You will probably help a lot of people, and support for this type of server may be added in the future.
|
|
|
|
## Bedrock Support
|
|
|
|
YES! You can connect to the server using Minecraft Bedrock and play with your friends. To do this, set the `SUPPORT_BEDROCK` environment variable to `1` and restart the server.
|
|
|
|
Bedrock players can connect to the server by specifying port `19132`, which is the default port for Minecraft Bedrock. The IP-address must be the same as the one used by Minecraft Java players.
|
|
|
|
**NOTE:** You must be running the latest version of Minecraft. If you want to upgrade to a newer version, you will need to manually remove `geyser.jar` and `floodgate.jar` from the `plugins` folder using SFTP (we wrote about this earlier). If you want to remove Minecraft Bedrock support, remove the plugins and set the `SUPPORT_BEDROCK` environment variable to `0`.
|
|
|
|
## Play worldwide
|
|
|
|
If you want to make the server available outside your WiFi network, you can use something like **No-IP**. I've never used it, so I can't give you any advice. If you know how it works, you can write instructions and send a pull request.
|
|
|
|
## Help
|
|
|
|
If you have any questions or want to get involved in the project in any way, you can use all GitHub instruments (Issues and Pull Requests) or just [email me](mailto:mail@mrkrk.me).
|
|
|
|
## License
|
|
|
|
Distributed under the terms of the Apache-2.0 License.
|
|
|
|
<hr>
|
|
|
|
You can find development blog [here](https://mrkrk.me/blog/portable-minecraft)
|